Social Media Agencies — Example #5
♦️ Business Model
With your social media agency, you can communicate with individuals/institutions from various sectors like series, films, programs, animations, anime, YouTube, etc., to publish their content on their behalf and share in the profits

Social media agencies undoubtedly have the highest potential for generating income from social media.

The primary reason for this is that they have a corporate identity, which makes their proposals much more significant compared to individual applications.
This is because institutions that are known by the state, pay their taxes, and have a fixed business address always have more credibility and trust in the eyes of others.

A well-performing, recognized, and trustworthy social media agency can quickly establish numerous partnerships.
Moreover, as they increase the number of partners, meaning their references, they can create many collaborations with foreign clients.
This opens the door to unlimited dollar earnings.
Yes, unlimited, because there is no limit to the income that can be generated through social media.
Any limits you’ve set can be overcome through new projects, collaborations, and initiatives that add to your efforts.

However, social media agencies have a very difficult problem to overcome in order to establish these collaborations.
— The Human Resources Needed to Produce the Content They Want to Create —
This major issue hinders agencies from realizing their true potential. Because the amount of content a single employee can produce during working hours is quite limited.

The primary reason for this limitation is that all existing video editing software is focused on “one” video.
The capability to edit many contents at once (cutting, trimming, adding text, images, background, sound, etc.) is almost nonexistent.
Because these softwares are not an “automation.”
Their main feature is at most Batch Processing, meaning that the same effects and processes are applied to selected videos, and that’s it.

VE3.Plus, on the other hand, cuts and trims each scene from the specified content and performs various editing operations on these contents individually, saving them to a folder.

In other words, the biggest difference is that in other video editing software, you need to cut, trim, and convert every scene you want to use from the main video into a new video, and then integrate all these videos into the software;
VE3.Plus does not have such a requirement.
The software performs all these operations within seconds.
An example of a project created to obtain 5 vertical videos from a horizontal video on YouTube:

In traditional software, employees have to deal with each content individually and obtain 1 content each time they run the software.
This necessity means a huge waste of time and therefore money.
To take the US as an example, the monthly cost to the company of a minimum wage earner varies between 3000 and 4500 dollars on average.
As the number of employees increases, the financial burden on the company will also rise.
Despite all this financial load, the number of contents produced may fall short of the desired number, thus the potential for new collaborations may also decrease.
In such a scenario, agencies will find it difficult to realize their true potential.

The primary goal of VE3.Plus is to reduce the video editing burden on content creators to the lowest possible level and enable them to create the desired number of contents after a few simple settings that take seconds.

With this preliminary information, let’s explore what a social media agency can do using VE3.Plus through examples.

Series - Film - Animation - Cartoon and TV Programs
From past to present, hundreds of thousands of unique contents have been created worldwide.
In countless countries, many contents have been produced, from series to films, cartoons to TV programs.
Almost all of these contents cannot be effectively used on social media by companies holding the copyrights.
This means; countless collaboration opportunities for social media agencies. Both domestically and internationally.
Additionally, companies that hold copyrights and are already producing content are also an option for collaboration.
These companies may prefer to work with you if they receive more attractive offers from the budgets they allocate for creating content or the agreements they make.

For example, let’s assume we made a 5-year agreement with the company holding the copyright for the world-famous cartoon Peppa Pig, specifically for its Shorts, Reels, and TikTok posts.
We created two accounts for the cartoon on each platform and will publish all produced content on these platforms.

On the first account, to take vertical cuts of scenes that might be of interest from the main horizontal content and share them,
On the second account, we set our roadmap to share each episode horizontally (full screen) in the middle of the video by writing “Part #1, Part #2” in the description.
In such a scenario, there would normally be employees who would have to deal with each episode and content individually, which is a time-consuming and time-consuming process.
However, with VE3.Plus, the entire process can be turned into child’s play.

For the first account, the only thing needed is to define the relevant episode in VE3.Plus and indicate which scenes will be used.
For this task, it is sufficient to add the start times of the desired scenes to a notepad and define them in the system.
For example, you wanted to create 60 pieces of content of 40 seconds each from a 2-hour video.
You have determined the start time of each scene and defined it to the system.
Since you want each scene to be 40 seconds, you set Factory > Duration > Video Duration to Fixed Duration > 40
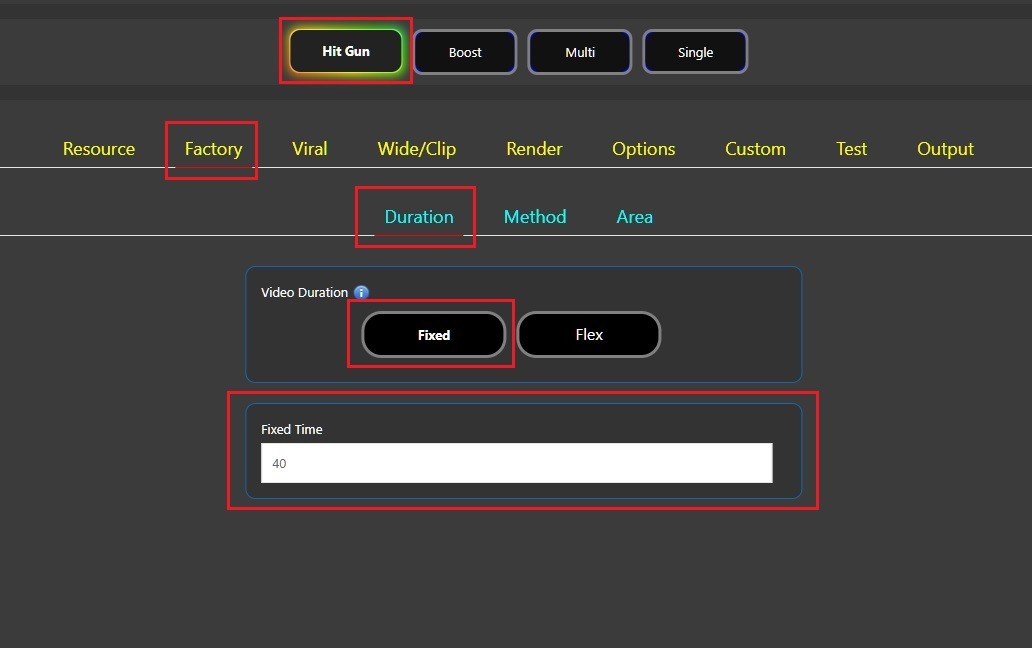
Since you want the content production to be done for the determined durations,
You checked the Factory > Method > Minute > Default option and defined the notepad containing the 60 scene start times in the system.
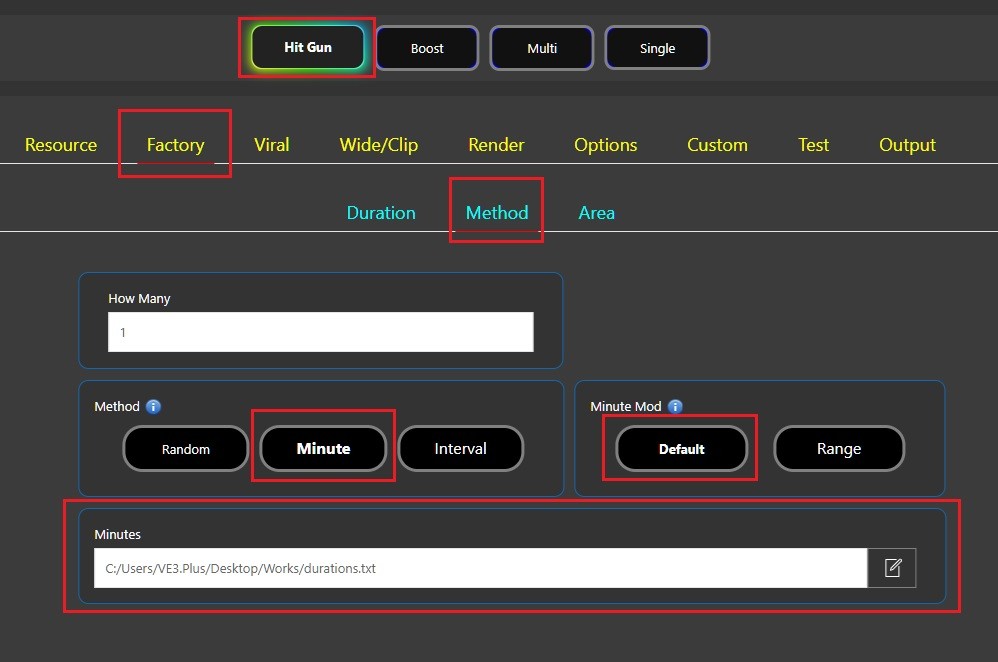
Your duration (scene) settings are complete; now it’s time to create the content structure.
Since you want to produce vertical content:
You selected “ Default (%38) ” from the Factory > Area option.
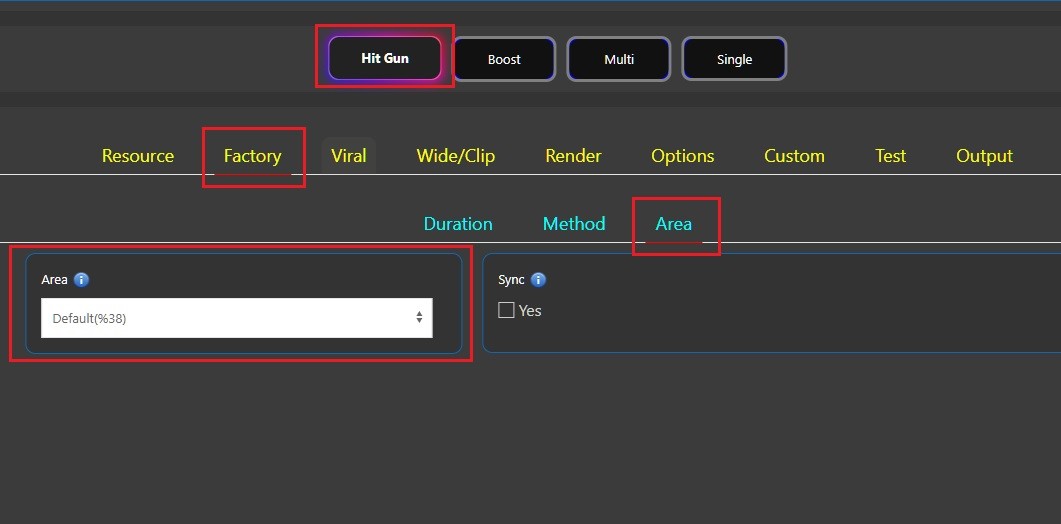
If the results you obtained are not as desired and you want a wider area to be visible, you can use the Factory > Area > Custom option to use the desired value instead of 38%.
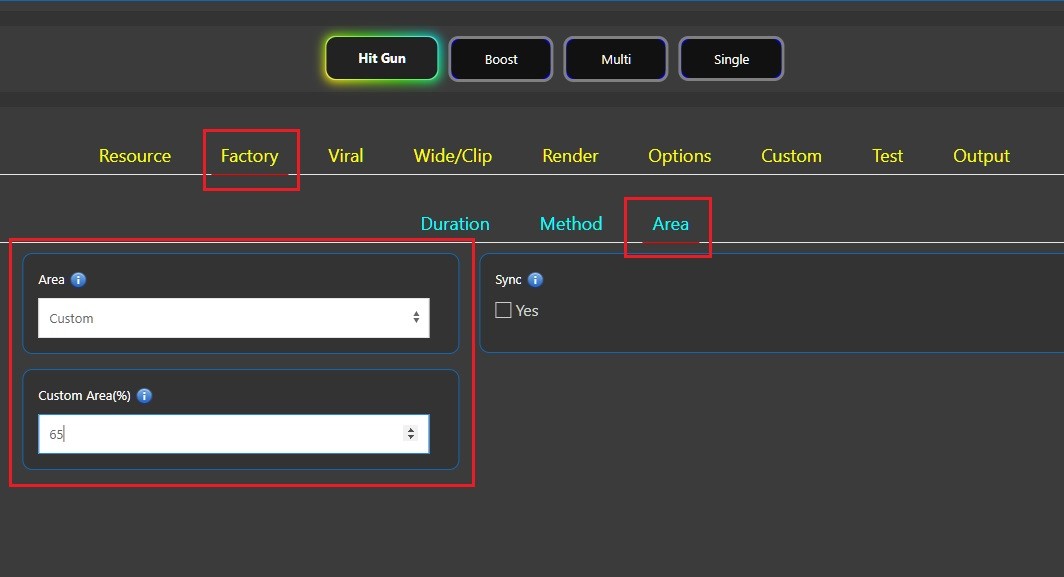
ℹ️ In this example, with a value of 65, it considers the center of the screen as the center and uses a total width of 65% and produces it as vertical content.
To make more specific selections, you can use the Factory > Area > Advanced option.

As a result of this work, normally, it would be necessary to deal with each video you want to produce individually, but after a few simple settings that take seconds, the production of 60 pieces of content will be executed by automation with a single click.
Moreover, thanks to the parallel rendering feature, scenes will be produced at the same time, so it will be completed in a much shorter time than expected.
Thus, while 1 employee can create, for example, 50 pieces of content per day, they will now be able to create over 500 pieces of content by utilizing the power of VE3.Plus.

In the second account, our goal is to add the main video in the center of the vertical video, and to place the design of our choice in the remaining spaces outside the video.
For these operations, we can utilize Canva.

First, since the content we want to create is in vertical format, we set our resolution values in Canva to 1080×1920 and create a blank page.
Next, we define the area where the video will be embedded (in our example, the red rectangle) and dress the remaining empty spaces with our desired design.
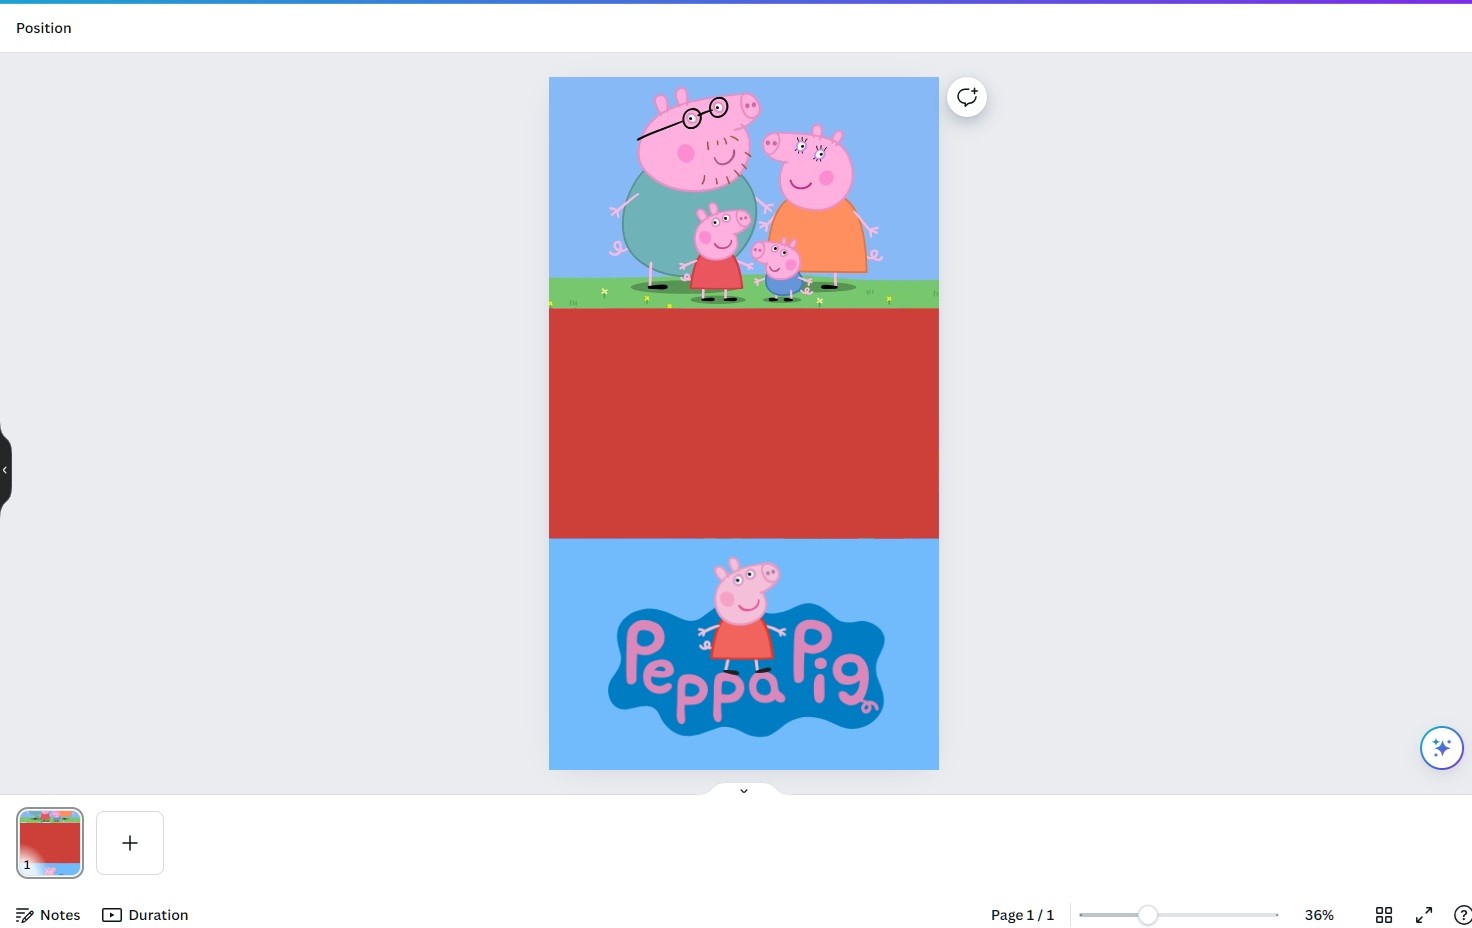
It’s as simple as that.
Now, we can save the prepared design as JPG or PNG and define it in VE3.Plus.

Since we are going to create a custom design and use it as a background, in VE3.Plus we use the “ Custom Design > Custom Background ” option.
Since our background is an image, we set the Type of Background to Image/Gif.
ℹ️ After the updates, .mp4 video can now be added to the Image/Gif option.
Then, we add the design we created to a folder and define this folder to our system.
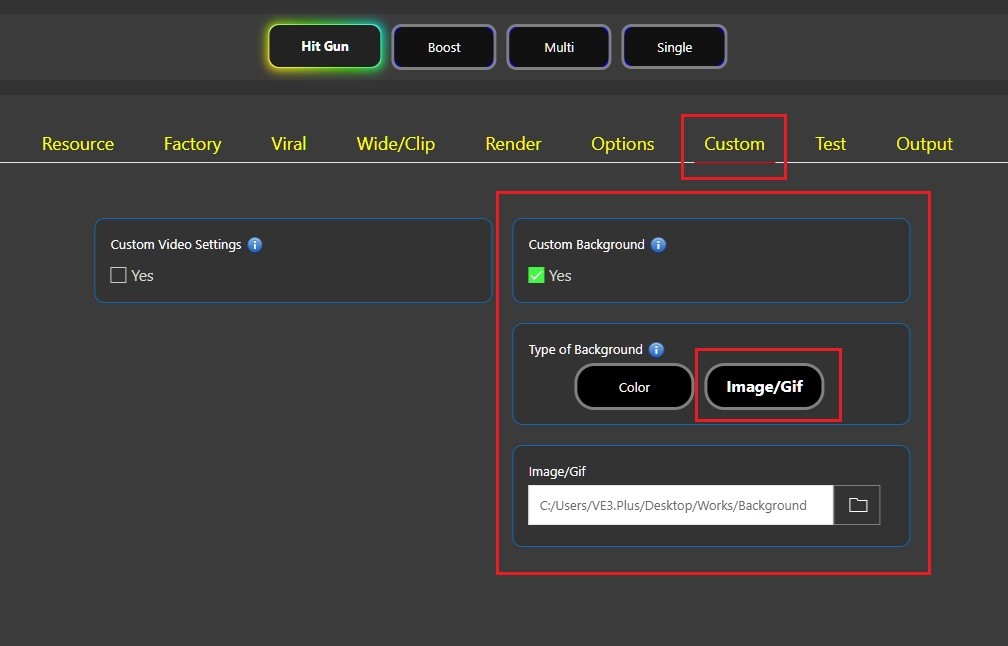
After integrating our design into VE3.Plus, we can proceed to the settings regarding the area where we will embed the video(the red rectangle).

Since we want to divide the video into 60-second sections, we enter the value 60 in the Video Duration > Fixed Duration option.
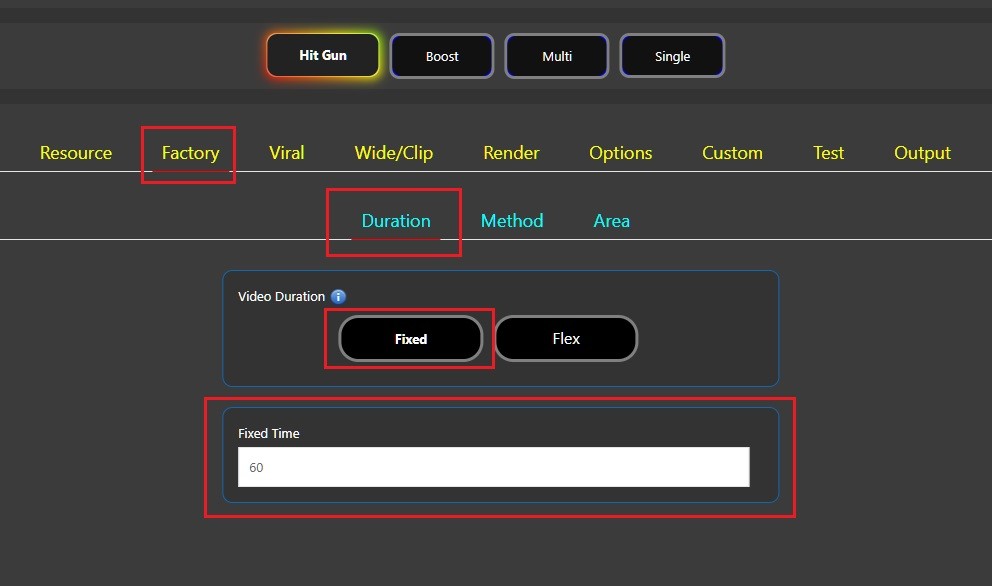
Since our goal is to divide the video, meaning we desire a process that progresses sequentially without defining special scenes,
We can benefit from the Factory > Method > Interval feature designed for such needs.
Within this feature, there are two separate options: Random and Regular.
Since we want to conduct a sequential process, we should activate the “Regular” option.
Because our goal is to divide our video into sections sequentially and publish them as:
“ Part #1, Part #2, … , Part #29, Part #30 ”
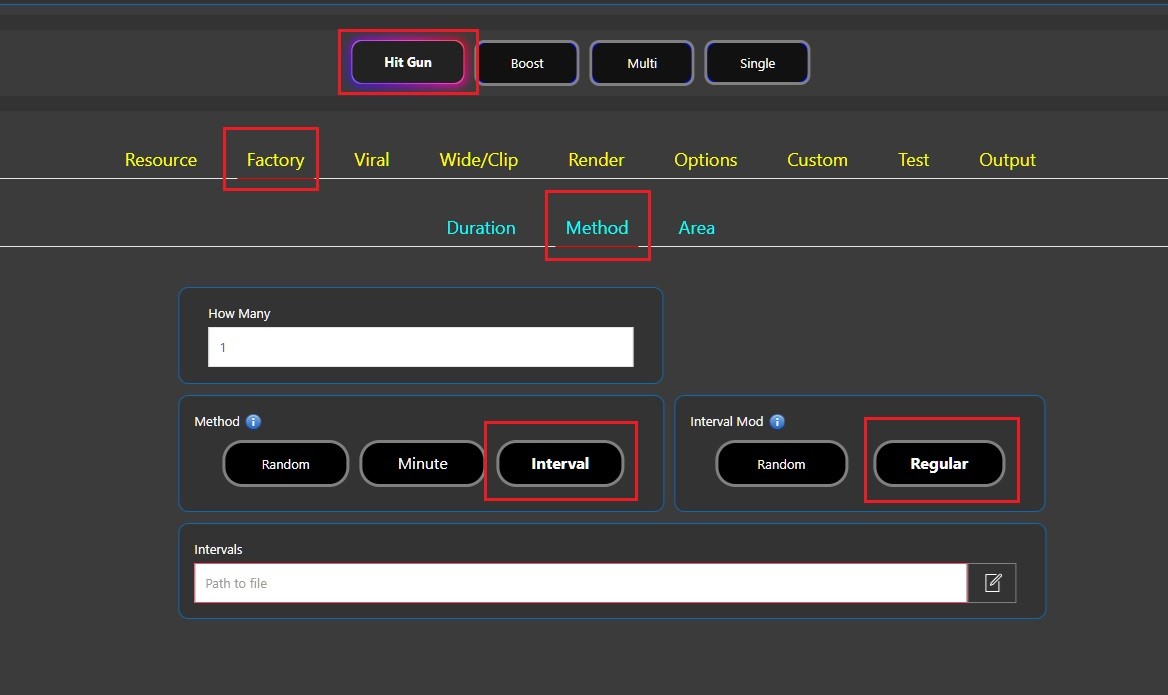
Now, we need to enter the duration settings.
We should define the duration of the video in a notepad and integrate it into the system.
For example, if the main video is 2 hours and 15 minutes long and we want to divide the entire video into sections, we should enter in the notepad:
0-2:15
➡️ Watch the “ Interval > Regular ” Tutorial
This way, the operations will continue from the starting point until completion.
We can now define the saved notepad with the settings in the system.
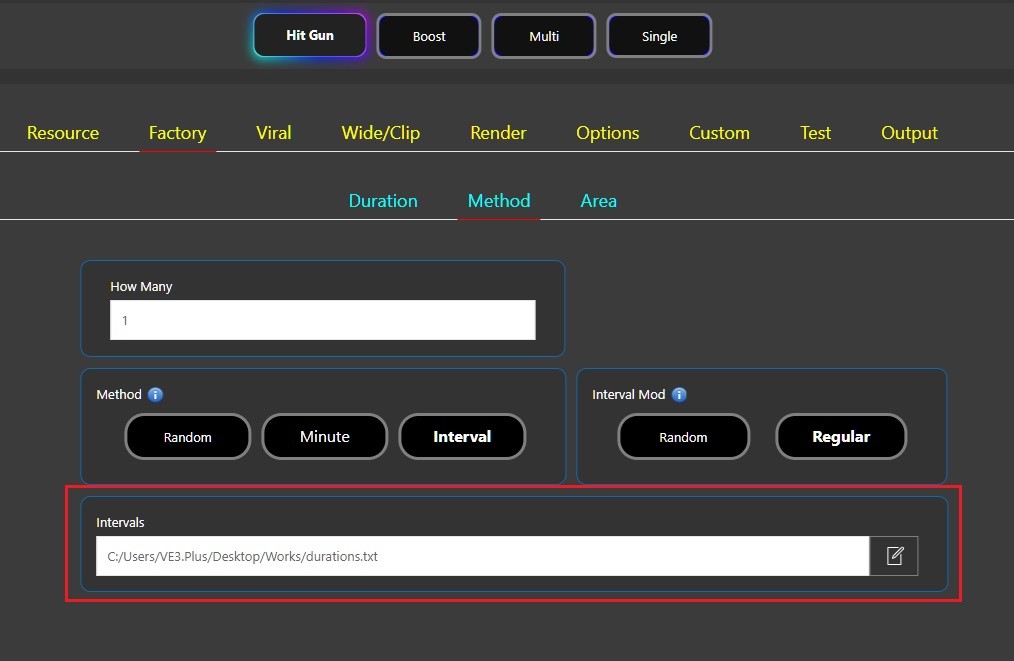

Once our duration settings are complete, the next step is to place the video in the relevant area, which is the center of the design.
This process requires custom positioning, so we need to use VE3.Plus's “ Custom Video Settings ” option.
With this option, we can resize the videos and place them wherever we want.

Once the Custom Video Settings are activated, we will see two options: “ Main Video Settings ” and “ Merged Video Settings ”.
Since we will only be processing the main video, we will use the Main Video Settings option.
In this option, VE3.Plus asks us for the values of “Width, Height, X Coordinate, Y Coordinate” in sequence.
This means it’s asking us what the width and height of your main video should be and where it should be positioned.
Since we want to place our main video in the center of our design, we need to obtain the width, height values, and coordinate information of the red rectangle in the center of the design.
To do this, we can open Canva and examine the data regarding the red rectangle.
First, click on the red rectangle and then click on the “Position” option; this will show the width, height, X, and Y coordinate information for the area where we want to embed our video.
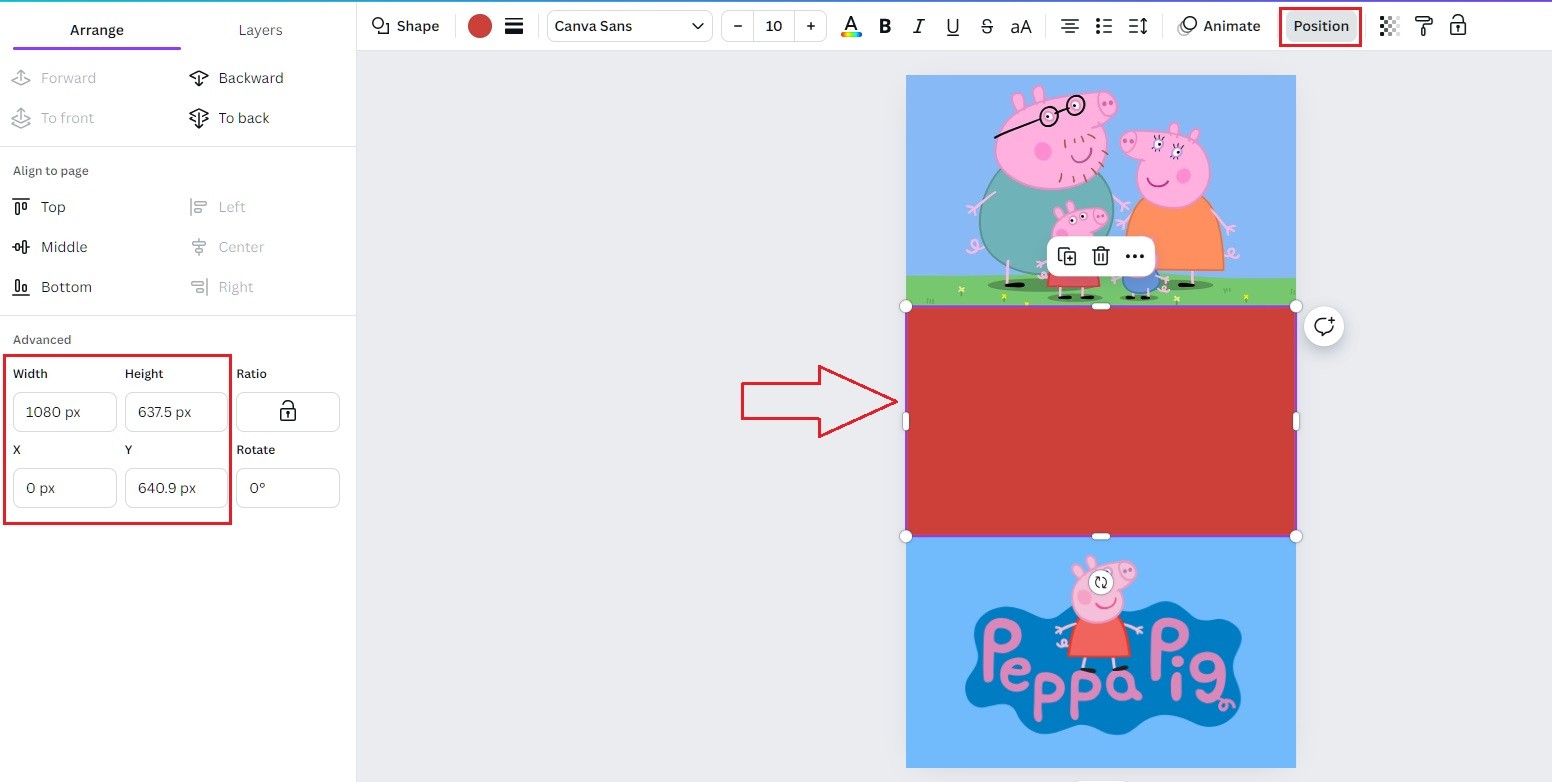
Once we define all this data in our system, our main video will be placed in the relevant section of the design and will play there.
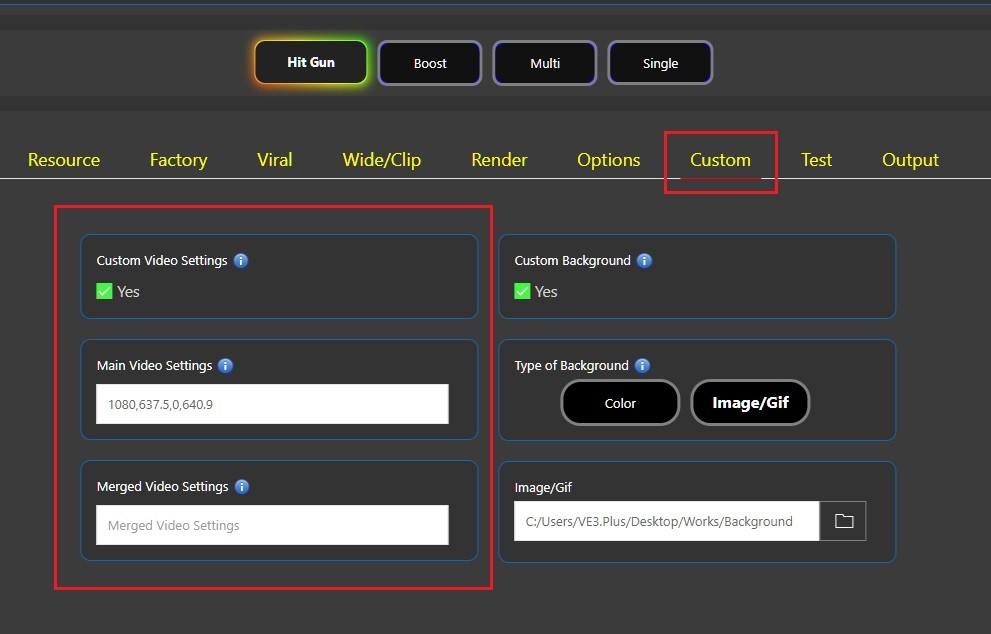

Now that all our settings are complete, we only need to set the necessary option to select the entire main video.
For this process:
We enable the Factory > Area > Custom option,
Since we want to use the entire content, we enter the value of:
“ 100 ”
This way, 100% of the content will be used, integrating it into our custom design.

Now, all our settings are complete. By performing the desired Render settings, we can run our system and obtain the entire segment as separate 60-second videos.

The processes illustrated through an example cartoon can be applied to all imaginable content types—from TV series to movies, TV shows to animations—using various methods and variations.
YouTube, Twitch, Kick, and Similar Platforms
At the beginning of our post, we mentioned the word “YouTube.” We would like to draw particular attention to this topic and the potential it holds.
There are countless content creators who produce and stream content on platforms such as YouTube, Twitch, and Facebook.
In the hundreds of thousands of videos that these creators have created in the past (and are still available in horizontal format on these platforms); there is unique content that contains millions of enjoyable and immersive moments.
However, in relation to the total content count, almost all of this content has not yet been uploaded to platforms like Shorts, TikTok, and Reels.

For instance, let’s consider a 4-hour horror game video uploaded to YouTube eight years ago.
From this 4-hour video; at least 100 unique content, each between 10-60 seconds long, that can be uploaded to platforms such as Shorts, Reels, Tiktok, etc. can be obtained.
Now let’s reconsider this great opportunity by reviewing millions of videos across all categories and “languages” available on YouTube and other platforms.

We can comfortably say that billions of unique contents are waiting to be discovered somewhere.

The fundamental reason why such work has not been done so far is that there has been no suitable video editing software available in the market that can manage and simplify the entire process.
In all existing systems, each video must be handled individually, but VE3.Plus allows you to create as many contents as you desire with your desired designs with just one click. Additionally, if the target video is on YouTube, you can do so without wasting time downloading it to your computer.

Thanks to all the advantages and opportunities provided by VE3.Plus, not only series, films, etc. but YouTubers and streamers can also be your target audience, allowing you to obtain unlimited “unique” content that has never been uploaded to platforms like Reels, TikTok, and Shorts.
➡️ What is Unique Content? Why is it Important?